Length – Meter ruler , Vernier caliper , Micrometer screw guage , Spectrometer , Travelling microscope
Mass – Electronic balance , Triple beam balance
Time – Stop watch , Digital clock
Least count
Vernier caliper
Internal jaws – for measuring inner dimensions
External jaws – for measuring outer dimensions
Depth bar – for measuring depths
Reading =main scale reading + vernier scale coincide × least count = 100+2×0.1=100.2 mm
Zero error and correction
The instrument is said to have if the zero of the main scale doesn’t coincide with the zero of the vernier scale when the two jaws of vernier caliper are brought into contact.
Zero error = 0.3 mm
Correction = -0.3 mm
Zero error = 0.8 mm
Correction = +0.8 mm
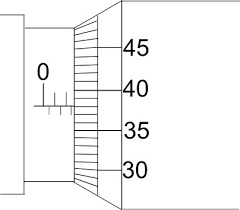
Pitch – It is the linear distance moved by thimble along the main scale when the thimble is given one rotation.
Least count = Pitch/Number of divisions in the circular scale
 Main scale – 0.5 mm divisions Least count=0.01mm
Reading = 2.5 + 38 ×0.01 = 2.88 mm
Zero error and correction
Spherometer
Pitch = It’s the linear distance moved along main scale when circular scale is given one completed rotation.
Least count = Pitch/Number of divisions in the circular scale.thDetermination of the radius of curvature of a spherical surface
R = a2/6h + h/2
a = distance between two legs
Travelling microscope
The principle component of a travelling microscope is it’s microscope. It enlarges the diameter so measurement can be done easily.

